Kategorien
Allgemein Code

Wie man ohne eigene Infrastruktur und mit wenig Aufwand eine Web-App mit “CMS” betreibt – kostenlos.

Ja, klar, alter Hut. CMS SaaS gibts ja auch wie Sand am Meer, aber, wenn man wirklich nur ne kleine API aus einer Tabellenartigen Struktur erzeugen will, ist das meist mit Kanonen auf Spatzen geschossen.

Ich bin ja Freund des Lean-Ansatzes. Also schnüren wir mal folgende Dinge:

  1. Einen Account bei GitLab (oder Github)
  2. Einen Account bei Netlify, Vercel o.ä.
  3. Einen Account bei Google.

Die meisten Web-Entwickler haben Punkt 1 und 3 schon erfüllt, schätze ich. Netlify oder Vercel hat vielleicht nicht jeder, am Ende tut es auch ein eigener Webspace, aber ich habe mich mit Netlify für den wenigsten Aufwand entschieden, da sie auch Cloud-Functions bieten. Das ist hier zwar nicht notwendig, aber ein nettes Feature, welches API-Calls sicherer macht.

Die Datenbank

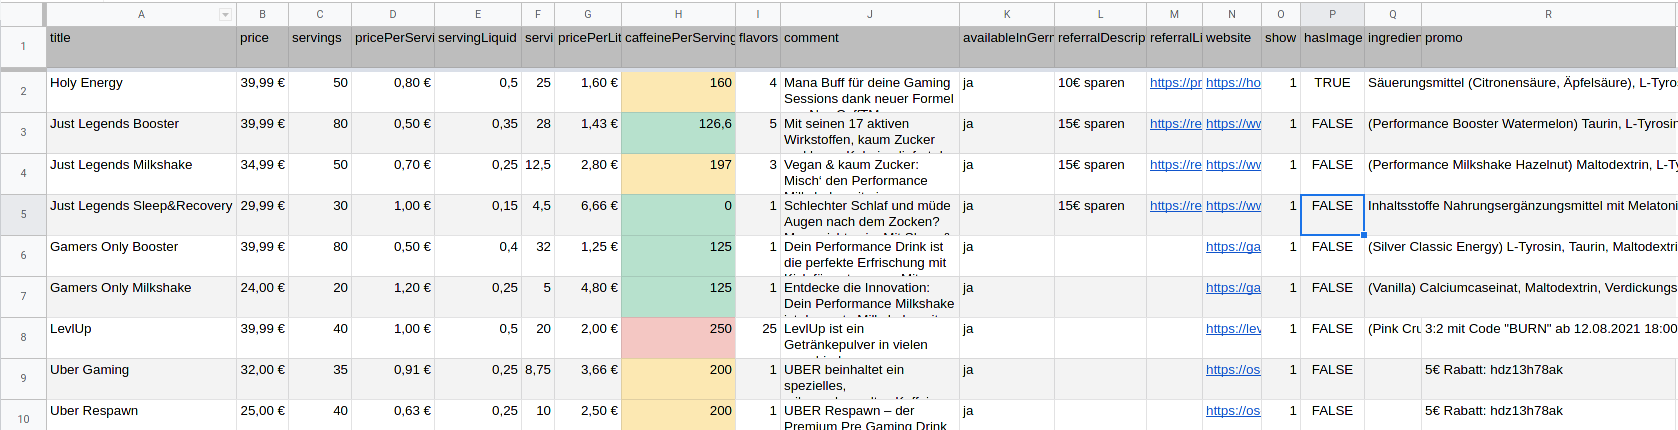
Eine Tabelle der Dinge, die ich darstellen wollte, gab es schon:

Übersicht über Gamingbooster am deutschen Markt

Auf Youtube habe ich eine sehr coole Einführung in Google Apps Script, welches im Kontext von Spreadsheet ausgeführt wird, gefunden.

Komprimiert ist das die Funktion die ihr im App Script einbauen wollt:

function doGet() {
  const spreadSheet = SpreadsheetApp.getActiveSpreadsheet()
  const workSheet = spreadSheet.getSheetByName('Übersicht Gaming Booster');
  const data = workSheet.getRange("A1").getDataRegion().getValues();
  const fieldNames = data.shift();

  let jsonArray = data.map((row, i) => {

    // remap header fieldname to create new object
    // makes api more robust on table changes
    const obj = row.reduce((acc, curr, idx) => {
      acc[fieldNames[idx]] = curr;
      return acc
    }, {id: i});
    return obj
  })

  return ContentService
    .createTextOutput(JSON.stringify(jsonArray))
    .setMimeType(ContentService.MimeType.JSON)
}

Damit wird aus Zeilen ein Array von Objekten gemacht, die man in einer Web-App gut verarbeiten kann. Die erste Zeile wird dabei als Property-Name für die Objekte genutzt. Wie man an die einzelnen Stellen herankommt, kann man in den Youtube-Videos gut sehen.

Das Frontend.

Das ist eine einfache Vue-App, in der zentralen App.vue Komponente werden die Daten von der Google-API abgerufen und im LocalStorage abgelegt. Durch Nutzung des Vue-PWA Plugins ist die App damit offline-fähig, nachdem sie das erste Mal geladen wurde.

Der automatische Build

Die Versionierung des Frontends liegt in einem privaten Repository auf Gitlab. In meinem Fall habe ich Netlify und Gitlab verknüpft. Damit bekomme ich in Netlify mit, wenn sich mein stabiler Entwicklungszweig ändert und fängt an, meine Anwendung neu aufzubauen.

Diese wird bei Netlify gehostet, dort wird ein npm install && npm run build ausgeführt und das Build-Artefakt als neue Homepage eingesetzt.

Anstelle von Netlify kann man auch Vercel oder Heroku nutzen, eigenen Webspace, Gitlab Pages via Gitlab CI, Github, Github Actions und Github Pages, die Liste an Möglichkeiten ist lang. Meine gewählte Kombi ist aus Bequemlichkeit entstanden (bekannter Workflow, Netlify bietet noch ein paar interessante Zusatzfunktionen, die ich gerne ausprobieren möchte). Und in dieser Form ist das einzige, was ich machen muss, entwickeln und versionieren, der Rest läuft automatisch. Wenn ich schon ein just-for-fun-Projekt mache, muss sich der Management-Overhead auch schon gegen 0 bewegen.

Bonuspunkte

Ich habe die Google-API in meinem Fall durch eine Netlify Function geproxyd, damit die URL immer gleich bleibt und von der App aus immer nur die neueste Funktion genutzt werden kann. Andernfalls könnte jemand die verschiedenen Stadien der API sehen und nutzen, auch wenn diese z.b. durch Änderungen in der Tabelle gar nicht mehr funktionieren oder Daten ausgeben, die ich gar nicht ausgeben will.

Wie lange dauert sowas?

Die erste Version der App hat ca. 3 halbe Tage (nach dem Feierabend) gebraucht. In der Zeit habe ich mit Vite und TypeScript angefangen, aufgrund wirklich merkwürdiger Fehler, die TS im Template-Teil einer Vue-Component das ganze noch mal mit Vue-CLI neu aufgesetzt, dann auf Vue-CLI 5-beta geupgraded und nach einer Auseinandersetzung damit, dass Typescript Sortierfunktionen gar nicht mag, wenn man nach einem dynamisch gewählten Feld sortiert (auch wenn es korrekt getyped wurde), fast einfach alles weggeworfen und auf Javascript umgebaut.

Ach ja, und die API habe ich sehr schnell von einem statischen Row-Index auslesen (MVP lässt grüßen) auf das dynamisch erweiterbare Schema welches oben schon erwähnt ist, umgestellt.

Fazit: Was gelernt und Spaß dabei

Wie eben schon erwähnt: Es ist eigentlich so ziemlich alles schief gelaufen, was hätte schief gehen können. Aber: ich habe Dinge über Typescript gelernt (das war mein erstes TypeScript Projekt). Ich habe eine Menge über Google App Scripts gelernt (die Funktion ist bei mir deutlich anders mittlerweile), mit Parametern und Co. und einem Mini-Counter als Mini-Statistik. Netlify und Gitlab und das automatische Bauen von Anwendungen kannte ich schon, Netlify Functions habe ich in diesem Projekt auch das erste Mal genutzt.

Was ich auf jeden Fall noch vorhabe: Einen Service-Worker bauen, der das Datenmanagement im Hintergrund macht und ggf. die PWA-Notification API nutzen um auf neu hinzugefügte Produkte aufmerksam zu machen. Das wird allerdings komplettes Neuland für mich.

Kategorien
Betriebssystem Code Werkzeuge

PHP, Docker, SELinux

When you try to use the PHP Docker Script from my previous post on a Linux distribution that uses SELinux (like Fedora), you might experience some problems.

Basically the Container will not have access to any of the required volumes like:

  • your project files
  • /etc/passwd
  • /etc/group
  • ~/.cache/composer
  • ~/.config/composer
  • ~/.ssh
  • the SSH agent socket

Is SELinux to blame?

To find out if your permission problems are really caused by SELinux you can temporarily disable access blocking:

sudo setenforce 0

When the files are accessible now, you know it’s SELinux. Make sure you turn on enforcing after you’re done testing:

sudo setenforce 1

The Z-flag

You could try to add the Z flag to the volume mapping but this is not recommended!

With the Z-flag set Docker will change the SELinux context of the files inside that volume (similar to a chcon call).

This might be OK for your project files but is highly discouraged for system files like /etc/passwd.

Detecting the problems

SELinux has a very extensive log at /var/log/audit/audit.log. It will log most of the time to this file when access was denied or granted.

In the case of my Docker container some of the problems did not show up in the audit log. To make sure all problems are logged you can use this command:

sudo semodule --disable_dontaudit --build

-D –disable_dontaudit
Temporarily remove dontaudits from policy. Reverts whenever policy is rebuilt

semodule man page

Analyse the log

The log entries you are interested in look like this:

type=AVC msg=audit(1573154170.047:519): avc: denied { read } for pid=37461 comm=„bash“ name=„passwd“ dev=„dm-1“ ino=1879487 scontext=system_u:system_r:container_t:s0:c61,c1013 tcontext=system_u:object_r:passwd_file_t:s0 tclass=file permissive=0

Excerpt from the audit.log

Important here are these parts:

  • the request was denied
  • scontext contains container_t
  • a request was made to a file Composer needs to access

audit2allow to the rescue!

Now we can start fixing the problems using audit2allow.

This tool analyses all failed entries of the SELinux audit log and generates a configuration that allows them.

First you copy all related audit log lines into a new file (let’s call it allow.log).

After that you pass the contents of the file to audit2allow and let it build a module:

cat allow.log | audit2allow -M containermods

Finally you need to load active the build module.

sudo semodule -i containermods.pp

This change is permanent and will survive reboots.

And repeat and repeat and…

You will most likely have to repeat the steps described above multiple times until everything is working smoothly. This means:

  • watch the audit log
  • try running the Composer command
  • append the related denied lines to allow.log
  • call audit2allow and load the module
  • repeat
Kategorien
Allgemein Code Werkzeuge

Running PHP with Docker

As a developer who works on multiple projects you often need different PHP versions for running tests or installing Composer packages.

I created a little Bash script that runs Docker for executing PHP in your project context. The script looks like this (don’t be scared, I will walk you through it step by step):

#!/usr/bin/env bash

phpVersion=7.2
remainingArguments="$@"

if [[ "$1" =~ (5.6|7.0|7.1|7.2|7.3) ]]; then
    phpVersion=$1
    remainingArguments="${@:2}"
fi

echo "Using PHP version $phpVersion"

docker run  --interactive --rm --tty \
    --user $(id -u):$(id -g) \
    -v ${HOME}/.ssh:${HOME}/.ssh:rw \
    -v ${SSH_AUTH_SOCK}:/ssh-auth.sock \
    --env SSH_AUTH_SOCK=/ssh-auth.sock \
    -v /etc/passwd:/etc/passwd:ro \
    -v /etc/passwd:/etc/group:ro \
    -v ${HOME}/.config/composer:${HOME}/.config/composer:rw \
    -v ${HOME}/.cache/composer:${HOME}/.cache/composer:rw \
    --env COMPOSER_CACHE_DIR=${HOME}/.cache/composer \
    --env COMPOSER_HOME=${HOME}/.config/composer \
    -v "$(pwd)":"$(pwd)":rw -w "$(pwd)" \
    --add-host db:127.0.0.1 \
    --net=host \
    intera/docker-ci-php:${phpVersion}-ubuntu \
    php${phpVersion} ${remainingArguments}

The script can be used like this:

php.sh 7.3 vendor/bin/phpunit

The first argument 7.3 is the PHP version. After that you can provide the arguments to the PHP command. The example above would run phpunit with PHP version 7.3.

You can also omit the PHP version argument and it will use the default PHP version that is defined in the script. The following command executes phpunit with PHP 7.2:

php.sh vendor/bin/phpunit

Argument Handling

The first block of the script handles the PHP version switching and extracting the remaining arguments that should be passed on to the PHP command.

By default PHP 7.2 is used and all arguments are passed on:

phpVersion=7.2
remainingArguments="$@"

If the first argument is a known PHP version it overwrites the default version and is removed from the arguments that are passed on:

if [[ "$1" =~ (5.6|7.0|7.1|7.2|7.3) ]]; then
    phpVersion=$1
    remainingArguments="${@:2}"
fi

The docker command parts

Let’s walk though the different parts of the docker command.

The first parameters will start an interactive terminal. Without them you won’t get nicely colored output:

--interactive --tty

The container is removed after the command is finished:

--rm

We switch the user and group to the currently logged on user to prevent permission problems. We also need to mount /etc/passwd and /etc/group. Otherwise the container would not know about the name of the current user and his groups. These volumes can be read-only (:ro).

--user $(id -u):$(id -g) \
-v /etc/passwd:/etc/passwd:ro \
-v /etc/passwd:/etc/group:ro \

The Composer directories from the user’s home directory are mounted to make sure the Composer cache is persisted and it has access to its config:

-v ${HOME}/.config/composer:${HOME}/.config/composer:rw \
-v ${HOME}/.cache/composer:${HOME}/.cache/composer:rw \
--env COMPOSER_CACHE_DIR=${HOME}/.cache/composer \
--env COMPOSER_HOME=${HOME}/.config/composer \

The current directory is mounted as a volume and the working directory of the Docker command is changed to this directory. Without access to your project files executing PHP would not make much sense 😉

Important! Please be aware that all files required by PHP (or Composer) must be subfolders of the current working directory. Symlinks that point outside that folder will not work.

-v "$(pwd)":"$(pwd)":rw -w "$(pwd)" \

The network part

In some of my (TYPO3) projects a Composer script is executed after install / update that needs access to the database (TYPO3 Console).

The database is running in a docker container and its port is mapped to my localhost. This allows me to use the following configuration:

--net=host \
--add-host db:127.0.0.1 \

The net=host option connects the container with the host network which allows it to access the database.

With add-host you can add additional hostname entries. In my case the Docker container running the database is called db which is also used as database hostname in the application config. With the entry above the db host will be resolved to your localhost.

The SSH part

This part is only required when you need SSH authentication. A common use case is loading private Git repositories via Composer.

The .ssh folder is mounted from the user’s home directory. This gives us access to the SSH config, the key files and the known_hosts file. You might be able to change this to a read-only volume when neither of these two conditions apply:

  • not all SSH hosts are present in your known_hosts file and SSH needs to update it
  • you are using a persistent SSH connection (ControlMasterControlPathControlPersist) and its path is located in your ~/.ssh folder

We also forward the socket of your SSH agent to use passwordless authentication:

-v ${HOME}/.ssh:${HOME}/.ssh:rw \
-v ${SSH_AUTH_SOCK}:/ssh-auth.sock \
--env SSH_AUTH_SOCK=/ssh-auth.sock \

The image

The Docker image is custom made and based on Ubuntu and the awesome PPA of Ondřej Surý.

It is publicly available on Docker Hub in PHP version 5.6 to 7.3.

The tag is switched depending on the selected PHP version.

Of course you can use your own image.

intera/docker-ci-php:${phpVersion}-ubuntu \

The PHP command (finally!)

The PHP command is switched based on the selected PHP version.

Finally the arguments passed to the command are forwarded to Composer.

php${phpVersion} ${remainingArguments}

Composer addon

The Docker images described above already contain a Composer executable at /usr/local/bin/composer.phar. This is an example to make use of it:

php.sh /usr/local/bin/composer.phar install

You can make your life even easier when you wrap the command above in another shell script that directly calls Composer:

#!/usr/bin/env bash

THIS_SCRIPT_DIR="$( cd "$( dirname `readlink -f "${BASH_SOURCE[0]}"` )" >/dev/null && pwd )"

phpVersion=7.2
remainingArguments="$@"

if [[ "$1" =~ (5.6|7.0|7.1|7.2|7.3) ]]; then
    phpVersion=$1
    remainingArguments="${@:2}"
fi

${THIS_SCRIPT_DIR}/php.sh ${phpVersion} /usr/local/bin/composer.phar ${remainingArguments}

Now you can just call

composer.sh install

SELinux

There might be issues with Linux distributions using SELinux.

I will publish another article soon that will provide solutions to these problems.

Kategorien
Code

Loading Indicator á la Youtube mit CSS

Loading-Balken
Der Plan

Nachdem ich eine vernüftige Ladeanimation gesucht habe, und bei allem immer irgendwie jQuery dranhängen musste, hab ich beschlossen, das ganze mal in lean zu lösen. Probleme dabei gibt es eigentlich nur im Bereich des Animationsstarts durch JS, dazu habe ich bei CSS-Tricks den passenden Tipp gefunden.

HTML:

<div class="loading-bar"></div>

CSS:

    .loading-bar {
        display: none;
        opacity: 0;
        position: absolute;

        top: 0;
        width: 100%;
        max-width: 100%;
        margin: 0;
        padding: 0;

        background: red;
        height: 0;
        animation-name: expand-width, fade;
        animation-duration: 1s, 4s;
        animation-delay: 0s, 1s;

        animation-iteration-count: 1;
    }

    .loading-bar.visible {
        display: block;
        opacity: 1;
        height: 2px;
    }

    @keyframes fade {
        from {
            height: 2px;
            opacity: 1;
        }
        to {
            height: 0;
            opacity: 0;
        }
    }

    @keyframes expand-width {
        from {
            width: 0;
        }
        to {
            width: 100%;
        }
    }

    @keyframes glow {
        from {
            box-shadow: 0 0 5px red,
            0 0 10px red,
            0 0 10px rgba(255, 165, 0, 1),
            0 0 20px rgb(255, 244, 0);
        }
        to {
            box-shadow: none;
        }

    }

    .loading-bar.visible:before {
        box-shadow: none;

        position: absolute;
        right: 0;
        content: "";
        display: block;
        height: 2px;
        width: 8px;
        animation-name: glow;
        animation-duration: 5s;
        animation-iteration-count: 1;
    }


Javascript:

    var links = document.querySelectorAll( 'a' ),
            linkslen = links.length;

    for ( var link = 0; link < linkslen; link++ ) {

        links[link].addEventListener( 'click', function ( e ) {
            var lb = document.querySelectorAll( '.loading-bar' )[0];
            lb.classList.remove( 'visible' );
            //noinspection SillyAssignmentJS
            // triggers reflow for animation restart
            lb.offsetHeight = lb.offsetHeight;
            lb.classList.add( 'visible' );
        }, false )
    }

Edit am 29.12.: Ich habe den Code mal ein bisschen lesbarer und einfacher gemacht. Dazu habe ich das innere DIV entfernt, dass CSS zusammengeführt und das JS ein bisschen lesbarer gemacht. Mein Partial aus meinem Hugo-Projekt habe ich mal als Gist online gestellt. Sichergestellt sein sollte, dass das Partial so eingefügt wird, dass .loading-bar direktes Kind-Element von BODY ist. Ansonsten müssen ggf. die Styles angepasst werden.

Kategorien
Code

Kleiner Tipp für auf den Weg.

Always code as if the guy who ends up maintaining your code will be a violent psychopath who knows where you live. Code for readability.
John F. Woods